Technical Installation · 6 min read
How to Assemble a Pent BBQ Shed: A Two-Person Walkthrough
The full two-person assembly sequence for a panel-built pent BBQ shed — base checks, wall order, the single-slope roof — plus the smoke, siting and safety rules that matter when there's a grill involved.
Two People, One Dry Day
Assembling a Pent BBQ Shed, From Base to First Cook
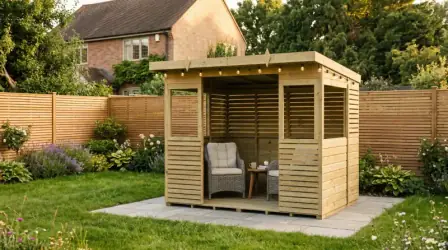
A pent BBQ shed is two builds in one: a straightforward panel shed with the friendliest roof we make, and an outdoor cooking spot that needs siting like a cook. Here is the full two-person sequence.
We've been hand-building garden buildings in our West Midlands workshop since 1995, and when a first-time builder asks where to start, we point them at a pent: one slope, no ridge, no apex geometry to wrestle. When that pent is a BBQ shed, you get a serving hatch and a dry base for the cook's kit into the bargain.
Everything below applies to any panel-built pent shed, ours or another maker's. We've left out panel counts, fixing sizes and model-specific steps deliberately — your assembly manual is the authority on those, and one ships with every building we make. For the generic panel sequence in depth, start with our flat-pack assembly guide; this article adds the pent and BBQ layers on top.
Site It for the Smoke, Not Just the View
Read the prevailing wind
Stand where the BBQ will live and think about where smoke goes on an ordinary breezy evening — away from your kitchen window, the neighbours' washing line, and the doorway you'll serve through.
Leave air on every side
A clear gap around the building lets air move, lets timber dry after rain, and lets you reach every panel for maintenance. Don't tuck it hard against a fence.
Hard, non-combustible standing
The cooking area wants slabs, concrete or stone underfoot — never decking, bark or dry grass. Dropped coals and hot fat should land on something that shrugs them off.
The BBQ cooks outside. Always.
Never run a lit or smouldering BBQ inside an enclosed, unventilated building — carbon monoxide is invisible, odourless and deadly. The shed shelters the cook, the prep and the kit; the fire stays in open air.
Base Checks Before a Single Panel Comes Off the Stack
- Level — put a spirit level across the base in several directions. You're after genuinely flat and level, not roughly.
- Square — measure both diagonals corner to corner; when the two figures match, the base is square.
- Right size — the base should match the building's footprint. A base proud of the walls catches rain and channels it under the floor.
- Firm — slabs that rock, or a timber frame with soft ground under one corner, will telegraph into every wall above.
- Weather — pick a dry, calm day. Roofing in wind is how membranes and tempers get torn.
If any check fails, stop and fix the base before the build — nearly every assembly problem we're asked to untangle traces back here. Our base preparation guide covers slabs and concrete; if you're going the timber-frame route, the timber base installation guide walks it end to end.
The Build: Back, Sides, Front, Roof
- 1
Unpack and check everything
Lay the panels flat on clean ground and check them against the parts list in your manual. A pent's walls are different heights by design, so identify which panel is which now, on the ground. Check for transit knocks before you fix anything — a damaged panel is easy to replace and miserable to build in.
- 2
Decide the fall, then floor down
A pent sheds all its water to the low side, so make sure the low edge points somewhere sensible — not over the door, the hatch, or where the cook will stand. Position the floor and measure both diagonals; when they match, everything above keys off it.
- 3
Stand the back wall
The back panel goes up first, flush to the floor's edge. One of you holds it plumb while the other fixes through the framing.
- 4
Sides join the back
Offer each side panel to the back wall and fix through the corner framing — snug, not tight. If a firm push can still shift a panel a few millimetres, that's exactly right; you'll want that give when you square up.
- 5
Front wall last
The front is the heaviest panel — it carries the door, and on a BBQ shed often the serving-hatch opening too. Two people, no heroics: walk it into place, fix to both side panels, snug like the rest.
- 6
Square the building, then tighten
Measure the diagonals across the walls and nudge until they match and the door swings sweetly. Only now go round and tighten every fixing. Tightening before squaring is the most common assembly mistake — a racked building fights you at roof, door and hatch.
- 7
Roof deck on
A pent deck is one flat plane — no ridge, no valleys — the friendliest roof in the range. Fix the deck as your manual shows, drilling pilot holes before screwing near any board end: end grain splits easily, and a split board at a roof edge is an invitation to water.
- 8
Cover the slope
One plane means one covering, with no ridge to detail. Felt does the job; EPDM rubber is the long-life alternative — a one-piece membrane with a life expectancy of around 50 years, and no joins to make on a pent. Our <a href="/how-to-install-epdm">EPDM fitting guide</a> covers the membrane step by step; <a href="/knowledge/felt-vs-epdm">felt vs EPDM</a> weighs the two honestly. Whichever you fit: never roof in wind.
- 9
Doors and serving hatch last
Final adjustments come last, once the building is square and the roof's weight has settled the frame. The door should close with a click, not a shove; the hatch should open and latch cleanly. Check a fold-down serving shelf with a spirit level — drinks have opinions about slopes.
- 10
Seal, treat, stand back
Run a silicone bead around windows and the hatch surround, then dab preservative on every cut and drill hole. Our framing arrives tanalised (pressure-treated), but a fresh cut exposes untreated timber — treating it keeps the 15-year anti-rot guarantee exactly as written.
The First Season, in Two Short Lists
In the first few weeks
- Nip up the fixings once the timber has settled — snug, never brutal.
- Watch where rain actually goes off the low edge in the first proper downpour.
- Re-check the door and hatch catches as the building settles.
- Walk the silicone lines after the first heavy rain and re-run any gaps.
Through the cooking season
- Keep the low edge clear of leaves so water leaves the roof rather than ponding.
- Sweep ash and fat off the hard standing — grease underfoot is a worse hazard than flame.
- Give cut ends another coat of preservative if any start to grey.
- Store gas bottles upright outside the building, valves closed — never inside an enclosed shed.
None of that is more than ten minutes with a driver and the kettle on. Our aftercare guide covers the year-round jobs in full — and all of it holds whether your pent came from our workshop or someone else's.
Straight Answers on the BBQ Bit
Can I cook inside the shed if I open the hatch and doors?
No — and we won't soften it. A lit or smouldering BBQ inside an enclosed, unventilated building produces carbon monoxide — invisible, odourless and potentially lethal. An open hatch is a serving counter, not ventilation. Cook in open air on the hard standing, and use the shed for prep, serving and shelter.
Is a pent easier to assemble than an apex shed?
In one honest way, yes: the roof is a single flat plane, so there's no ridge to align. The wall sequence is identical. The one extra thing to mind is that a pent's walls are different heights — identify each panel on the ground before you start.
How big should the hard standing around the BBQ be?
There's no magic number, and we won't invent one. The practical test: dropped coals and hot fat should land on slab or stone, never timber or grass, and the cook should manage a full step back from a flare-up without leaving the hard area. If in doubt, lay another row of slabs.
Do you deliver, and is the manual included?
Yes to both. Delivery is free across the UK mainland, and an assembly manual ships with every building we make. If a panel comes off the van with a transit knock, photograph it and get in touch before you build it in — we made it, so replacing it is straightforward.
Ready for the first cook?
Design your pent BBQ shed in the Build Studio — size, doors, hatch placement — hand-built in our West Midlands workshop since 1995 and delivered free across the UK mainland.
Design yours in the Build StudioReady to put it into practice? Every building is made in our West Midlands workshop with free mainland delivery.
Browse buildings →